视频教程
前言 声明:此教程为新手保姆级教程,可能会有对您无用的废话,请移步至右上角菜单自行跳转需要的部分
写这篇教程的目的也是总结我的踩坑日记,帮助更多的新手朋友能接触到博客的圈子全篇使用到的工具已上传至百度网盘 | 提取码: 3z8c 夸克网盘 蓝奏云 | 密码:3ald
①* 本文默认本地开发环境为Windows10/11 x64Windows10 x64Ubuntu22.04 LTS
Hexo框架 *① 01.安装核心工具NodeJS和Git 操作步骤 1.1 .安装 Node.js
官网:Download | Node.js
版本建议: Hexo 要求 NodeJS 版本不低于 10.13,建议使用 12.0 及以上版本的 LTS 版
安装注意: 安装程序时,请确保勾选 Add to PATH 选项,这会让系统能随时在命令行中找到NodeJS
1.2 .安装 Git
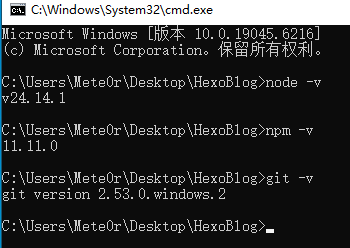
1.3. 检查安装状态 随意位置打开CMD,依次运行命令:
若看到返回版本信息,证明安装成功
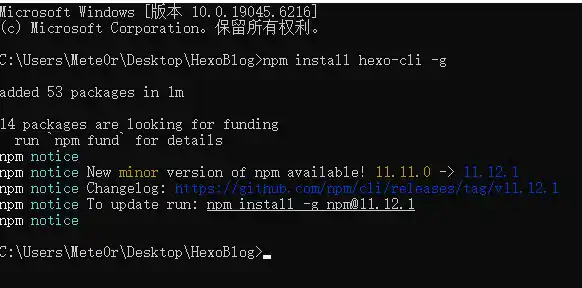
02.安装Hexo博客框架 2.1. 安装Hexo 运行如下命令:
2.2. 创建博客本地开发环境文件夹 注意:这个文件夹内的文件不要放在公开类型的仓库中,若您配置了需要Token的项目,会有Token泄露风险
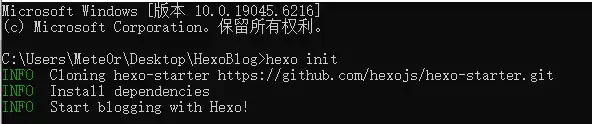
在你需要的位置创建一个文件夹(名称不要有中文)例如./HexoBlogcmd
提示:若出现‘command not found’,就在前面加上npx,如:npx hexo init
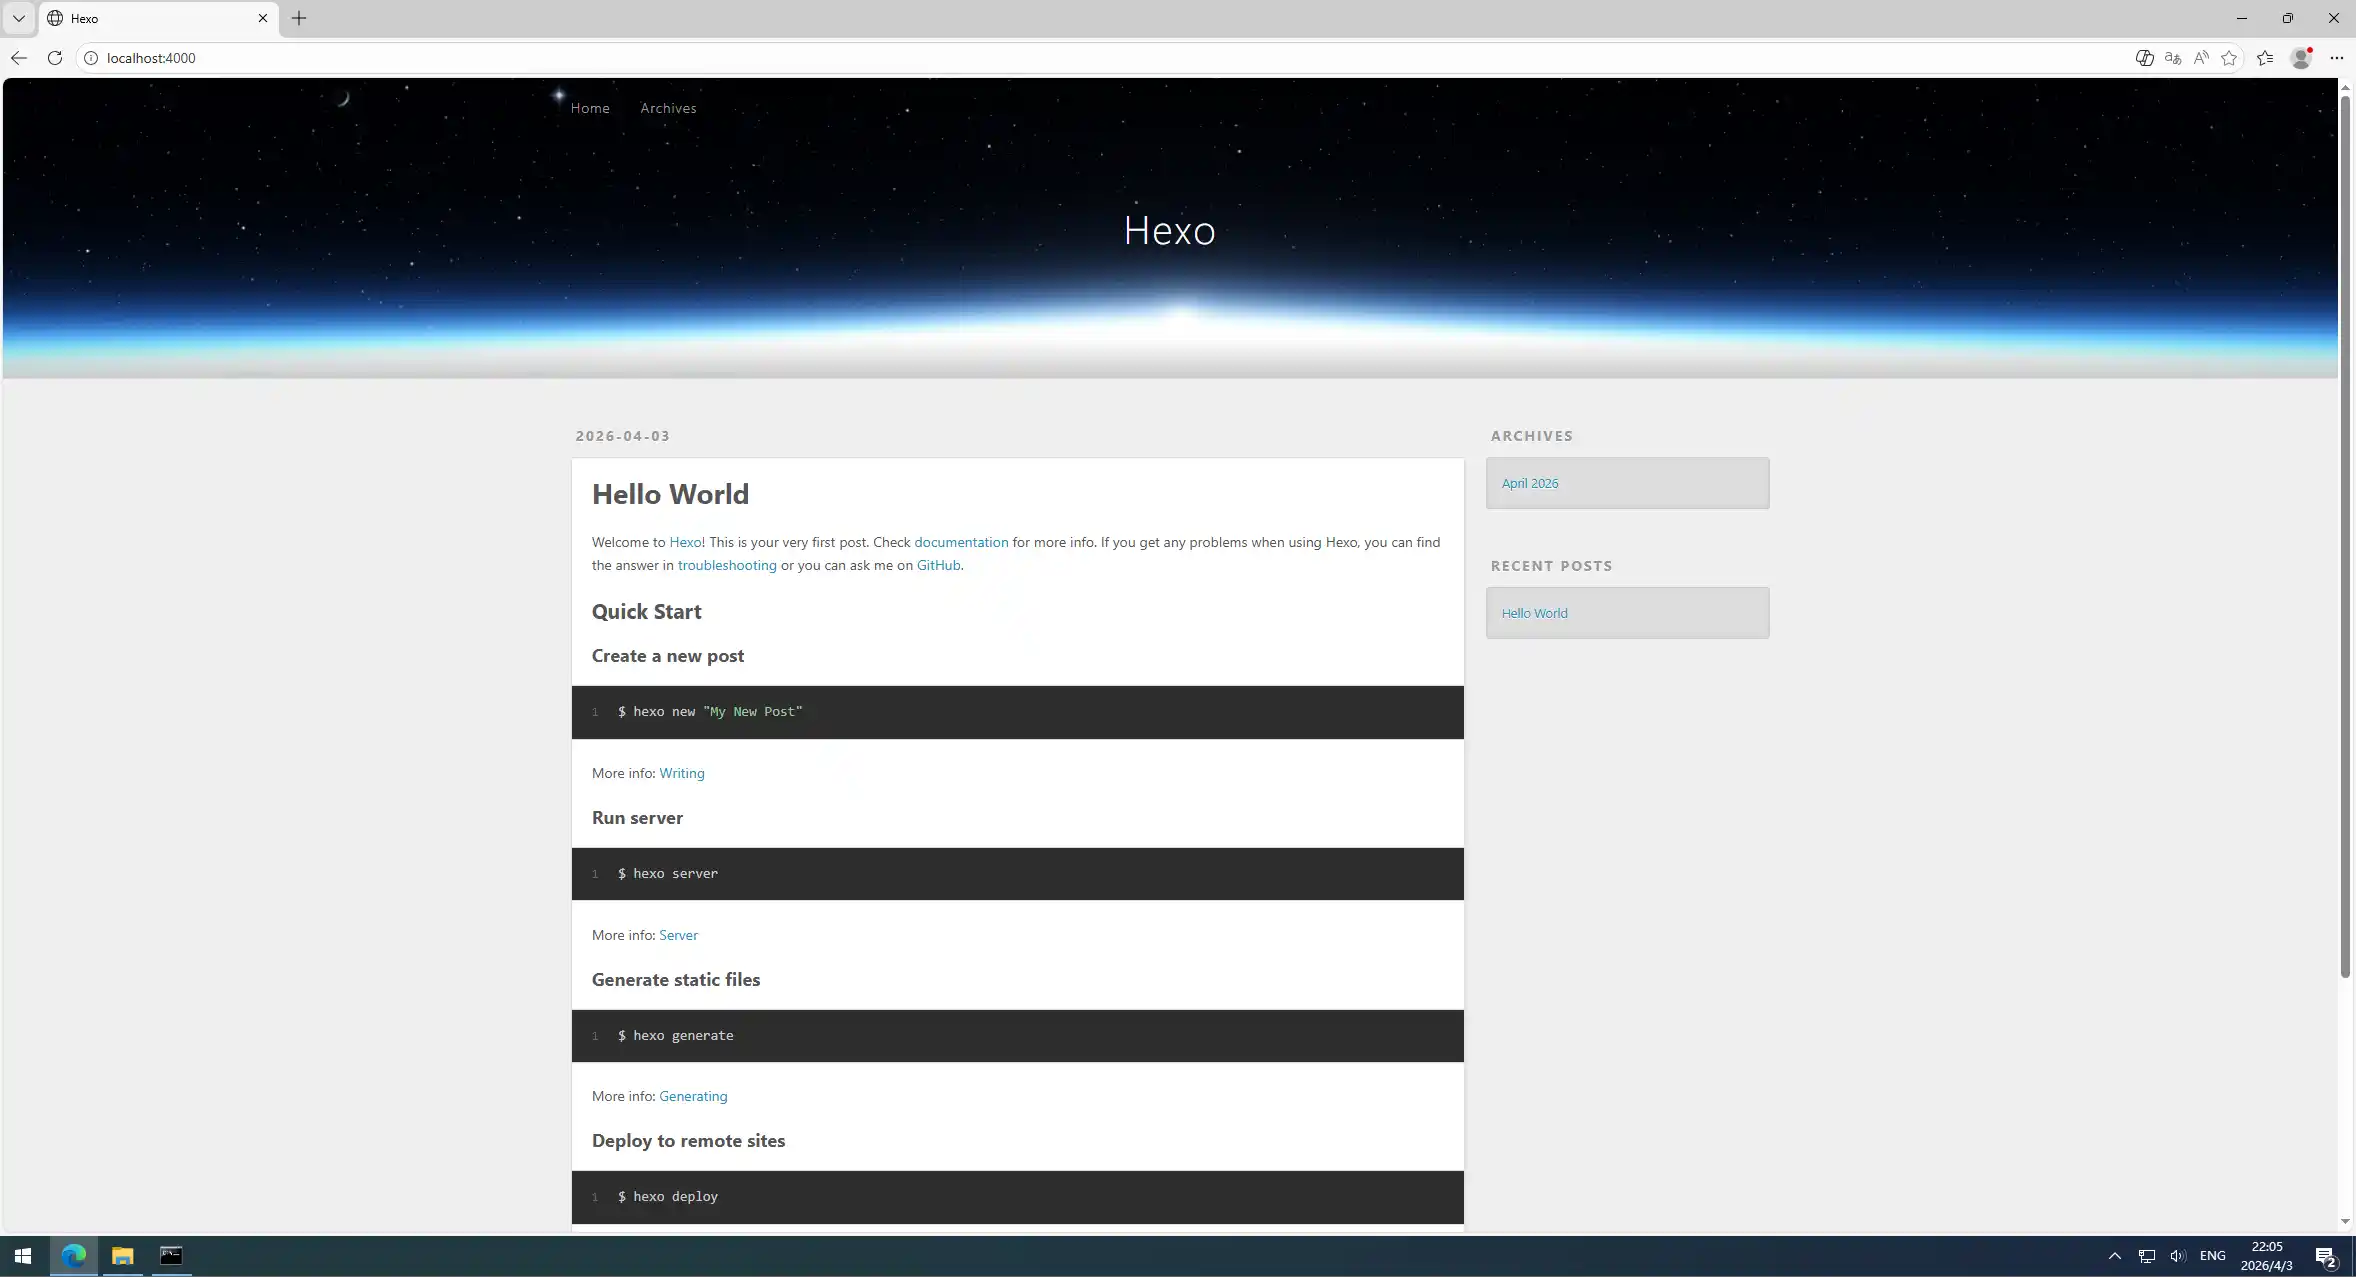
完成则如下图所示:
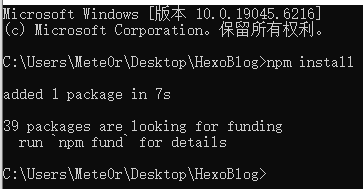
继续输入:
hexo server命令启动博客,访问http://localhost:4000即可看到博客(Ctrl+C结束程序)
2.3. 下载你喜欢的博客主题
这里以我自己用的Hexo - Stellar主题 为例
03. 安装主题并修改配置文件 3.1. 安装主题 在地址栏双击运行cmd
1 npm i hexo-theme-stellar --save
从 Hexo 7.x 版本开始,通过 npm install 安装的主题会存放在 node_modules 目录下,而不再是 themes 文件夹
3.2. 修改配置文件
官网:Download | VSCode
安装:全部无脑下一步即可,建议选择SSD硬盘安装,以加速启动速度
插件推荐:Bracket Pair Color DLW / indent-rainbow / Markdown Preview Enhanced / Dracula Theme Official
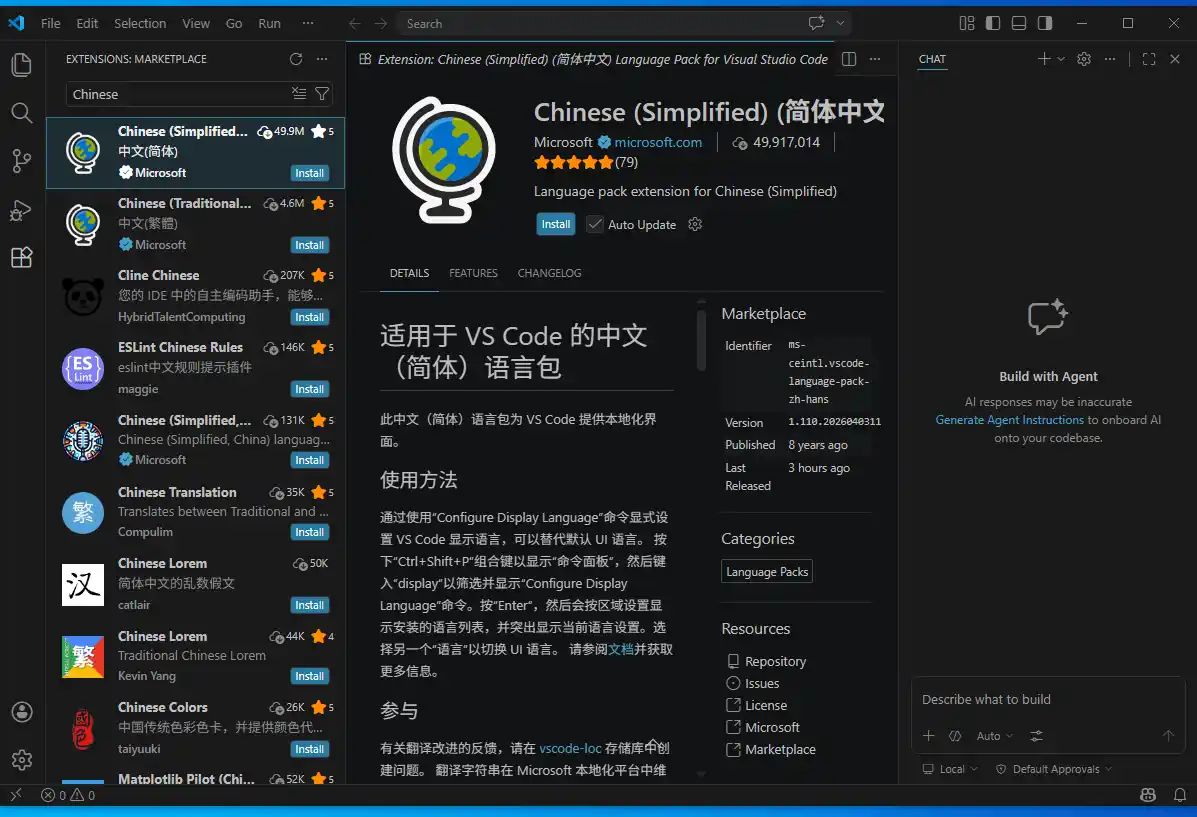
3.2.2. 更改VSCode语言为简体中文
点击左侧插件库图标
搜索Chinese
安装Chinese (Simplified) 简体中文
重启VSCode
3.2.3. 修改Hexo配置文件 使用VSCode打开博客项目文件夹_config.yml文件
可以直接粘贴替换为以下代码:
_config.yml
1 2 3 4 5 6 7 8 9 10 11 12 13 14 15 16 17 18 19 20 21 22 23 24 25 26 27 28 29 30 31 32 33 34 35 36 37 38 39 40 41 42 43 44 45 46 47 48 49 50 51 52 53 54 55 56 57 58 59 60 61 62 63 64 65 66 67 68 69 70 71 72 73 74 75 76 77 78 79 80 81 82 83 84 85 86 87 88 89 90 91 92 93 94 95 96 97 98 99 100 101 102 103 104 105 106 107 108 title: subtitle: '' description: '' favicon: "" avatar: "" keywords: author: John Doe language: en timezone: '' url: http://example.com permalink: :year/:month/:day/:title/ permalink_defaults: pretty_urls: trailing_index: true trailing_html: true source_dir: source public_dir: public tag_dir: tags archive_dir: archives category_dir: categories code_dir: downloads/code i18n_dir: :lang skip_render: new_post_name: :title.md default_layout: post titlecase: false external_link: enable: true field: site exclude: '' filename_case: 0 render_drafts: false post_asset_folder: false relative_link: false future: true syntax_highlighter: highlight.js highlight: line_number: true auto_detect: false tab_replace: '' wrap: true hljs: false prismjs: preprocess: true line_number: true tab_replace: '' index_generator: path: '' per_page: 10 order_by: -date default_category: uncategorized category_map: tag_map: meta_generator: true date_format: YYYY-MM-DD time_format: HH:mm:ss updated_option: 'mtime' per_page: 10 pagination_dir: page include: exclude: ignore: theme: stellar deploy: type: ''
3.2.4. 配置主题
在博客项目文件夹中运行以下命令以创建主题的默认配置文件:
1 copy .\node_modules\hexo-theme-stellar\_config.yml .\_config.stellar.yml
配置主题配置文件.\_config.stellar.yml此项目由于自定义程度过高,不予详细介绍,请自行根据注释修改,如有任何问题,欢迎在评论区进行提问
_config.stellar.yml
1 2 3 4 5 6 7 8 9 10 11 12 13 14 15 16 17 18 19 20 21 22 23 24 25 26 27 28 29 30 31 32 33 34 35 36 37 38 39 40 41 42 43 44 45 46 47 48 49 50 51 52 53 54 55 56 57 58 59 60 61 62 63 64 65 66 67 68 69 70 71 72 73 74 75 76 77 78 79 80 81 82 83 84 85 86 87 88 89 90 91 92 93 94 95 96 97 98 99 100 101 102 103 104 105 106 107 108 109 110 111 112 113 114 115 116 117 118 119 120 121 122 123 124 125 126 127 128 129 130 131 132 133 134 135 136 137 138 139 140 141 142 143 144 145 146 147 148 149 150 151 152 153 154 155 156 157 158 159 160 161 162 163 164 165 166 167 168 169 170 171 172 173 174 175 176 177 178 179 180 181 182 183 184 185 186 187 188 189 190 191 192 193 194 195 196 197 198 199 200 201 202 203 204 205 206 207 208 209 210 211 212 213 214 215 216 217 218 219 220 221 222 223 224 225 226 227 228 229 230 231 232 233 234 235 236 237 238 239 240 241 242 243 244 245 246 247 248 249 250 251 252 253 254 255 256 257 258 259 260 261 262 263 264 265 266 267 268 269 270 271 272 273 274 275 276 277 278 279 280 281 282 283 284 285 286 287 288 289 290 291 292 293 294 295 296 297 298 299 300 301 302 303 304 305 306 307 308 309 310 311 312 313 314 315 316 317 318 319 320 321 322 323 324 325 326 327 328 329 330 331 332 333 334 335 336 337 338 339 340 341 342 343 344 345 346 347 348 349 350 351 352 353 354 355 356 357 358 359 360 361 362 363 364 365 366 367 368 369 370 371 372 373 374 375 376 377 378 379 380 381 382 383 384 385 386 387 388 389 390 391 392 393 394 395 396 397 398 399 400 401 402 403 404 405 406 407 408 409 410 411 412 413 414 415 416 417 418 419 420 421 422 423 424 425 426 427 428 429 430 431 432 433 434 435 436 437 438 439 440 441 442 443 444 445 446 447 448 449 450 451 452 453 454 455 456 457 458 459 460 461 462 463 464 465 466 467 468 469 470 471 472 473 474 475 476 477 478 479 480 481 482 483 484 485 486 487 488 489 490 491 492 493 494 495 496 497 498 499 500 501 502 503 504 505 506 507 508 509 510 511 512 513 514 515 516 517 518 519 520 521 522 523 524 525 526 527 528 529 530 531 532 533 534 535 536 537 538 539 540 541 542 543 544 545 546 547 548 549 550 551 552 553 554 555 556 557 558 559 560 561 562 563 564 565 566 567 568 569 570 571 572 573 574 575 576 577 578 579 580 581 582 583 584 585 586 587 588 589 590 591 592 593 594 595 596 597 598 599 600 601 602 603 604 605 606 607 608 609 610 611 612 613 614 615 616 617 618 619 620 621 622 623 624 625 626 627 628 629 630 631 632 633 634 635 636 637 638 639 640 641 642 643 644 645 646 647 648 649 650 651 652 653 654 655 656 657 658 659 660 661 662 663 664 665 666 667 668 669 670 671 672 673 674 675 676 677 678 679 680 681 682 683 684 685 686 687 688 689 690 691 692 693 694 695 696 697 698 699 700 701 702 703 704 705 706 707 708 709 710 711 712 713 714 715 716 717 718 719 720 721 722 stellar: version: '1.33.1' homepage: 'https://xaoxuu.com/wiki/stellar/' repo: 'https://github.com/xaoxuu/hexo-theme-stellar' main_css: /css/main.css main_js: /js/main.js preconnect: canonical: originalHost: officialHosts: - localhost - example.com open_graph: enable: true twitter_id: structured_data: links: [] logo: avatar: '[{config.avatar}](/about/)' title: '[{config.title}](/)' subtitle: '{config.subtitle}' menubar: columns: 4 items: site_tree: home: leftbar: welcome, recent rightbar: index_blog: base_dir: blog menu_id: post leftbar: welcome, recent rightbar: nav_tabs: index_topic: base_dir: topic menu_id: post index_wiki: base_dir: wiki menu_id: wiki leftbar: related, recent rightbar: nav_tabs: post: menu_id: post leftbar: related, recent rightbar: ghrepo, toc topic: menu_id: post wiki: menu_id: wiki leftbar: tree, related, recent rightbar: ghrepo, toc notebooks: base_dir: notebooks menu_id: notebooks leftbar: recent rightbar: null notes: menu_id: notebooks leftbar: tagtree, recent rightbar: null note: leftbar: tagtree, recent rightbar: toc author: base_dir: author menu_id: post leftbar: recent, timeline rightbar: timeline error_page: menu_id: post '404': '/404.html' leftbar: recent, timeline rightbar: timeline page: leftbar: recent rightbar: toc notebook: auto_excerpt: 128 tagcons: '' : solar:hashtag-square-bold per_page: null order_by: -updated license: false share: false article: type: tech indent: cover_ratio: 2 banner_ratio: 2.5 auto_banner: false auto_excerpt: 128 category_color: '探索号' : '#f44336' license: '本文采用 [署名-非商业性使用-相同方式共享 4.0 国际](https://creativecommons.org/licenses/by-nc-sa/4.0/) 许可协议,转载请注明出处。' share: related_posts: enable: false max_count: 5 search: service: local_search local_search: field: all path: /search.json content: true skip_search: algolia_search: appId: apiKey: indexName: js: https://gcore.jsdelivr.net/algoliasearch/3/algoliasearch.min.js comments: service: comment_title: 快来参与讨论吧~ lazyload: false custom_css: beaudar: repo: xxx/xxx issue-term: pathname issue-number: theme: preferred-color-scheme label: input-position: top comment-order: desc keep-theme: loading: false branch: main utterances: repo: xxx/xxx issue-term: pathname issue-number: theme: preferred-color-scheme label: giscus: src: https://giscus.app/client.js data-repo: xxx/xxx data-repo-id: data-category: data-category-id: data-mapping: pathname data-strict: 0 data-reactions-enabled: 1 data-emit-metadata: 0 data-input-position: top data-theme: preferred_color_scheme data-lang: zh-CN data-loading: crossorigin: anonymous twikoo: js: https://gcore.jsdelivr.net/npm/twikoo@1.6/dist/twikoo.all.min.js envId: https://xxx waline: js: https://gcore.jsdelivr.net/npm/@waline/client@3.1/dist/waline.js css: https://gcore.jsdelivr.net/npm/@waline/client@3.1/dist/waline.css meta_css: https://gcore.jsdelivr.net/npm/@waline/client@3.1/dist/waline-meta.css serverURL: https://waline.vercel.app commentCount: true pageview: false artalk: css: https://unpkg.com/artalk@2.9/dist/Artalk.css js: https://unpkg.com/artalk@2.9/dist/Artalk.js server: site: '' darkMode: auto fancybox: true imageUploader: footer: social: sitemap: content: | 本站由 [{author.name }](/) 使用 [{theme.name } {theme.version }]({theme.tree}) 主题创建。 本博客所有文章除特别声明外,均采用 [CC BY-NC-SA 4.0 ](https://creativecommons.org/licenses/by-nc-sa/4.0/) 许可协议,转载请注明出处。 tag_plugins: note: default_color: '' border: true checkbox: interactive: false quot: default: prefix: bxs:quote-left suffix: bxs:quote-right hashtag: prefix: solar:hashtag-square-bold question: prefix: ph:seal-question-fill emoji: default: https://gcore.jsdelivr.net/gh/cdn-x/emoticons@3.1/qq/{name}.gif twemoji: https://gcore.jsdelivr.net/gh/twitter/twemoji/assets/svg/{name}.svg qq: https://gcore.jsdelivr.net/gh/cdn-x/emoticons@3.1/qq/{name}.gif aru: https://gcore.jsdelivr.net/gh/cdn-x/emoticons@3.1/aru/{name}.gif tieba: https://gcore.jsdelivr.net/gh/cdn-x/emoticons@3.1/tieba/{name}.png blobcat: https://gcore.jsdelivr.net/gh/cdn-x/emoticons@3.1/blobcat/{name}.gif icon: default_color: accent button: default_color: theme image: fancybox: false copy: toast: 复制成功 timeline: max-height: 80vh mark: default_color: yellow hashtag: default_color: okr: border: true status: in_track: color: blue label: 正常 at_risk: color: yellow label: 风险 off_track: color: orange label: 延期 finished: color: green label: 已完成 unfinished: color: red label: 未完成 gallery: layout: grid size: mix ratio: square chat: api: https://siteinfo.listentothewind.cn/api/v1 dependencies: jquery: https://gcore.jsdelivr.net/npm/jquery@3.7/dist/jquery.min.js marked: https://gcore.jsdelivr.net/npm/marked@13.0/lib/marked.umd.min.js lazyload: js: https://gcore.jsdelivr.net/npm/vanilla-lazyload@19.1/dist/lazyload.min.js transition: fade fix_ratio: true data_services: mdrender: js: /js/services/mdrender.js siteinfo: js: /js/services/siteinfo.js api: ghinfo: js: /js/services/ghinfo.js rating: js: /js/services/rating.js api: https://star-vote.xaox.cc/api/rating vote: js: /js/services/vote.js api: https://star-vote.xaox.cc/api/vote sites: js: /js/services/sites.js friends: js: /js/services/friends.js friends_and_posts: js: /js/services/friends_and_posts.js timeline: js: /js/services/timeline.js fcircle: js: /js/services/fcircle.js weibo: js: /js/services/weibo.js memos: js: /js/services/memos.js voice: js: /js/plugins/voice.js video: js: /js/plugins/video.js download-file: js: /js/plugins/download-file.js twikoo: js: /js/services/twikoo_latest_comment.js waline: js: /js/services/waline_latest_comment.js artalk: js: /js/services/artalk_latest_comment.js giscus: js: /js/services/giscus_latest_comment.js contributors: edit_this_page: '_posts/': 'wiki/stellar/': https://github.com/xaoxuu/hexo-theme-stellar-docs/blob/main/ js: /js/services/contributors.js plugins: preload: enable: true service: flying_pages flying_pages: https://gcore.jsdelivr.net/npm/flying-pages@2/flying-pages.min.js fancybox: enable: true loader: /js/plugins/fancybox-loader.js js: https://gcore.jsdelivr.net/npm/@fancyapps/ui@5.0/dist/fancybox/fancybox.umd.js css: https://gcore.jsdelivr.net/npm/@fancyapps/ui@5.0/dist/fancybox/fancybox.css selector: .timenode p>img swiper: enable: true css: https://unpkg.com/swiper@10.3/swiper-bundle.min.css js: https://unpkg.com/swiper@10.3/swiper-bundle.min.js scrollreveal: enable: js: https://gcore.jsdelivr.net/npm/scrollreveal@4.0/dist/scrollreveal.min.js distance: 8px duration: 500 interval: 50 scale: 1 tianli_gpt: enable: js: https://jsd.onmicrosoft.cn/gh/qxchuckle/Post-Summary-AI@6.0/chuckle-post-ai.min.js field: post key: 5Q5mpqRK5DkwT1X9Gi5e total_length: 1000 typewriter: true summary_directly: true rec_method: all hide_shuttle: true summary_toggle: false interface: name: AI摘要 introduce: '我是文章辅助AI: QX-AI,点击下方的按钮,让我生成本文简介、推荐相关文章等。' version: TianliGPT button: ["介绍自己" , "推荐文章" , "生成摘要" , "矩阵穿梭" ] katex: enable: inject: | <link rel="stylesheet" href="https://gcore.jsdelivr.net/npm/katex@0.16/dist/katex.min.css" integrity="sha384-vKruj+a13U8yHIkAyGgK1J3ArTLzrFGBbBc0tDp4ad/EyewESeXE/Iv67Aj8gKZ0" crossorigin="anonymous"> mathjax: v3: false enable: js: https://cdnjs.cloudflare.com/ajax/libs/mathjax/2.7.6/MathJax.js?config=TeX-AMS-MML_HTMLorMML mermaid: enable: style_optimization: false js: https://gcore.jsdelivr.net/npm/mermaid@v9/dist/mermaid.min.js theme: neutral copycode: enable: true default_text: 'Copy' success_text: 'Copied' toast: 复制成功 heti: enable: false css: https://unpkg.com/heti@0.9/umd/heti.min.css js: https://unpkg.com/heti@0.9/umd/heti-addon.min.js style: prefers_theme: auto smooth_scroll: true font-size: root: 16px body: 17px code: 85 % codeblock: 0. 8125rem font-family: body: 'system-ui, "Microsoft Yahei", "Segoe UI", Arial, sans-serif' code: 'Menlo, Monaco, Consolas, system-ui, monospace, sans-serif' codeblock: 'Menlo, Monaco, Consolas, system-ui, monospace, sans-serif' text-align: left prefix: h2: https://api.iconify.design/ci:heading-h2.svg border-radius: card-l: 24px card: 16px card-s: 12px bar: 8px image-l: 24px image: 16px image-s: 8px color: theme: 'hsl(192 98% 55%)' accent: 'hsl(14 100% 57%)' link: 'hsl(207 90% 54%)' animated_avatar: animate: auto background: https://gcore.jsdelivr.net/gh/cdn-x/placeholder@1.0.12/avatar/round/rainbow64@3x.webp codeblock: scrollbar: 4px highlightjs_theme: https://gcore.jsdelivr.net/gh/highlightjs/cdn-release@11.9/build/styles/atom-one-dark.min.css loading: loading: 正在加载 error: 加载失败,请稍后重试。 gradient: start: 'linear-gradient(to right, hsl(215, 95%, 64%), hsl(195, 95%, 60%), hsl(165, 95%, 56%), hsl(165, 95%, 56%), hsl(195 95% 60%), hsl(215, 95%, 64%))' leftbar: background-color: var(--card) background-image: url(https://gcore.jsdelivr.net/gh/cdn-x/placeholder@1.0.13/image/sidebar-bg1@small.jpg) blur-px: 100px blur-bg: var(--bg-a60) background-opacity: 0.8 paginator: prev: https://gcore.jsdelivr.net/gh/cdn-x/placeholder@1.0.12/arrow/f049bbd4e88ec.svg next: https://gcore.jsdelivr.net/gh/cdn-x/placeholder@1.0.12/arrow/064b95430caf4.svg error_page: https://gcore.jsdelivr.net/gh/cdn-x/placeholder@1.0.12/404/1c830bfcd517d.svg site: blur-px: 100px blur-bg: var(--bg-a75) blur-sat: 300 % header_prefix: h2: '#' h3: '=' h4: '|' h5: ':' default: avatar: https://gcore.jsdelivr.net/gh/cdn-x/placeholder@1.0.12/avatar/round/3442075.svg link: https://gcore.jsdelivr.net/gh/cdn-x/placeholder@1.0.12/link/8f277b4ee0ecd.svg cover: https://gcore.jsdelivr.net/gh/cdn-x/placeholder@1.0.12/cover/76b86c0226ffd.svg image: https://gcore.jsdelivr.net/gh/cdn-x/placeholder@1.0.12/image/2659360.svg project: https://gcore.jsdelivr.net/gh/cdn-x/placeholder@1.0.12/image/2779789.png banner: https://gcore.jsdelivr.net/gh/cdn-x/placeholder@1.0.12/banner/books.jpg topic: https://gcore.jsdelivr.net/gh/cdn-x/placeholder@1.0.12/image/10433048.png loading: https://api.iconify.design/eos-icons:three-dots-loading.svg?color=%231cd0fd image_onerror: "data:image/svg+xml,%3Csvg xmlns='http://www.w3.org/2000/svg' width='2rem' height='2rem' viewBox='0 0 24 24'%3E%3C!-- Icon from Solar by 480 Design - https://creativecommons.org/licenses/by/4.0/ --%3E%3Cpath fill='%23F44336' d='M22 12.698c-.002 1.47-.013 2.718-.096 3.743c-.097 1.19-.296 2.184-.74 3.009a4.2 4.2 0 0 1-.73.983c-.833.833-1.893 1.21-3.237 1.39C15.884 22 14.2 22 12.053 22h-.106c-2.148 0-3.83 0-5.144-.177c-1.343-.18-2.404-.557-3.236-1.39c-.738-.738-1.12-1.656-1.322-2.795c-.2-1.12-.236-2.512-.243-4.241Q1.999 12.737 2 12v-.054c0-2.148 0-3.83.177-5.144c.18-1.343.557-2.404 1.39-3.236s1.893-1.21 3.236-1.39c1.168-.157 2.67-.175 4.499-.177a.697.697 0 1 1 0 1.396c-1.855.002-3.234.018-4.313.163c-1.189.16-1.906.464-2.436.994S3.72 5.8 3.56 6.99C3.397 8.2 3.395 9.788 3.395 12v.784l.932-.814a2.14 2.14 0 0 1 2.922.097l3.99 3.99a1.86 1.86 0 0 0 2.385.207l.278-.195a2.79 2.79 0 0 1 3.471.209l2.633 2.37c.265-.557.423-1.288.507-2.32c.079-.972.09-2.152.091-3.63a.698.698 0 0 1 1.396 0' opacity='.5'/%3E%3Cpath fill='%23F44336' fill-rule='evenodd' d='M17.5 11c-2.121 0-3.182 0-3.841-.659S13 8.621 13 6.5s0-3.182.659-3.841S15.379 2 17.5 2s3.182 0 3.841.659S22 4.379 22 6.5s0 3.182-.659 3.841S19.621 11 17.5 11m-1.47-7.03a.75.75 0 1 0-1.06 1.06l1.47 1.47l-1.47 1.47a.75.75 0 0 0 1.06 1.06l1.47-1.47l1.47 1.47a.75.75 0 1 0 1.06-1.06L18.56 6.5l1.47-1.47a.75.75 0 0 0-1.06-1.06L17.5 5.44z' clip-rule='evenodd'/%3E%3C/svg%3E" api_host: ghapi: api.github.com ghraw: raw.githubusercontent.com gist: gist.github.com ghcard: github-readme-stats.vercel.app system: override_pretty_urls: true
部署服务器程序 04. 安装Artalk评论系统和Lsky兰空图床 4.1 租赁服务器 这里我推荐VPS租赁商 | 八壹云计算
只做推荐,可以自行选择服务商,建议预算足够优先阿里云或者腾讯云一类的大厂
我们这里介绍无ICP备案计划的建站步骤
③* 本文默认服务器部署环境为Ubuntu22.04 LTS
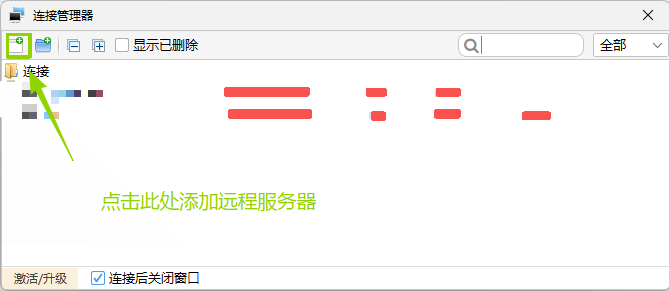
4.2 安装FinalShell FinalShell 是一个开源的SSH终端工具,可以轻松管理远程服务器
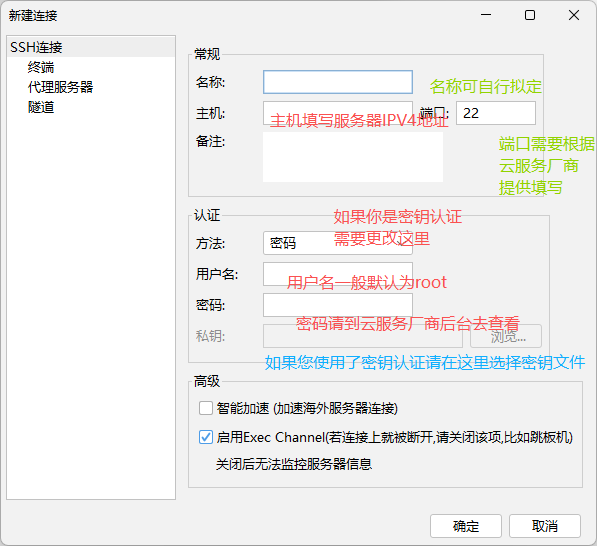
4.3 链接远程服务器 SSH连接(Linux)
注意:一些云服务厂商的默认SSH端口可能为随机端口,未声明则为22默认端口
4.4 安装1Panel
博主喜欢所有程序都放在Docker容器中执行,以保护主机,个人习惯,所以本文使用1Panel
1 bash -c "$(curl -sSL https://resource.fit2cloud.com/1panel/package/v2/quick_start.sh) "
配置:在安装过程中需要手动设置安全入口,用户名,密码(在您输入密码时候不会显示)
4.5 配置Docker 登录进入1Panel管理面板,依次选择[左侧]容器 -> [上方]配置 -> 全部配置
1
2
3
4
5
6
7
8
9
10
11
{ "registry-mirrors" : [ "https://hub.rat.dev" , "https://docker.1panel.live" ] , "log-driver" : "json-file" , "log-opts" : { "max-size" : "10m" , "max-file" : "3" } }
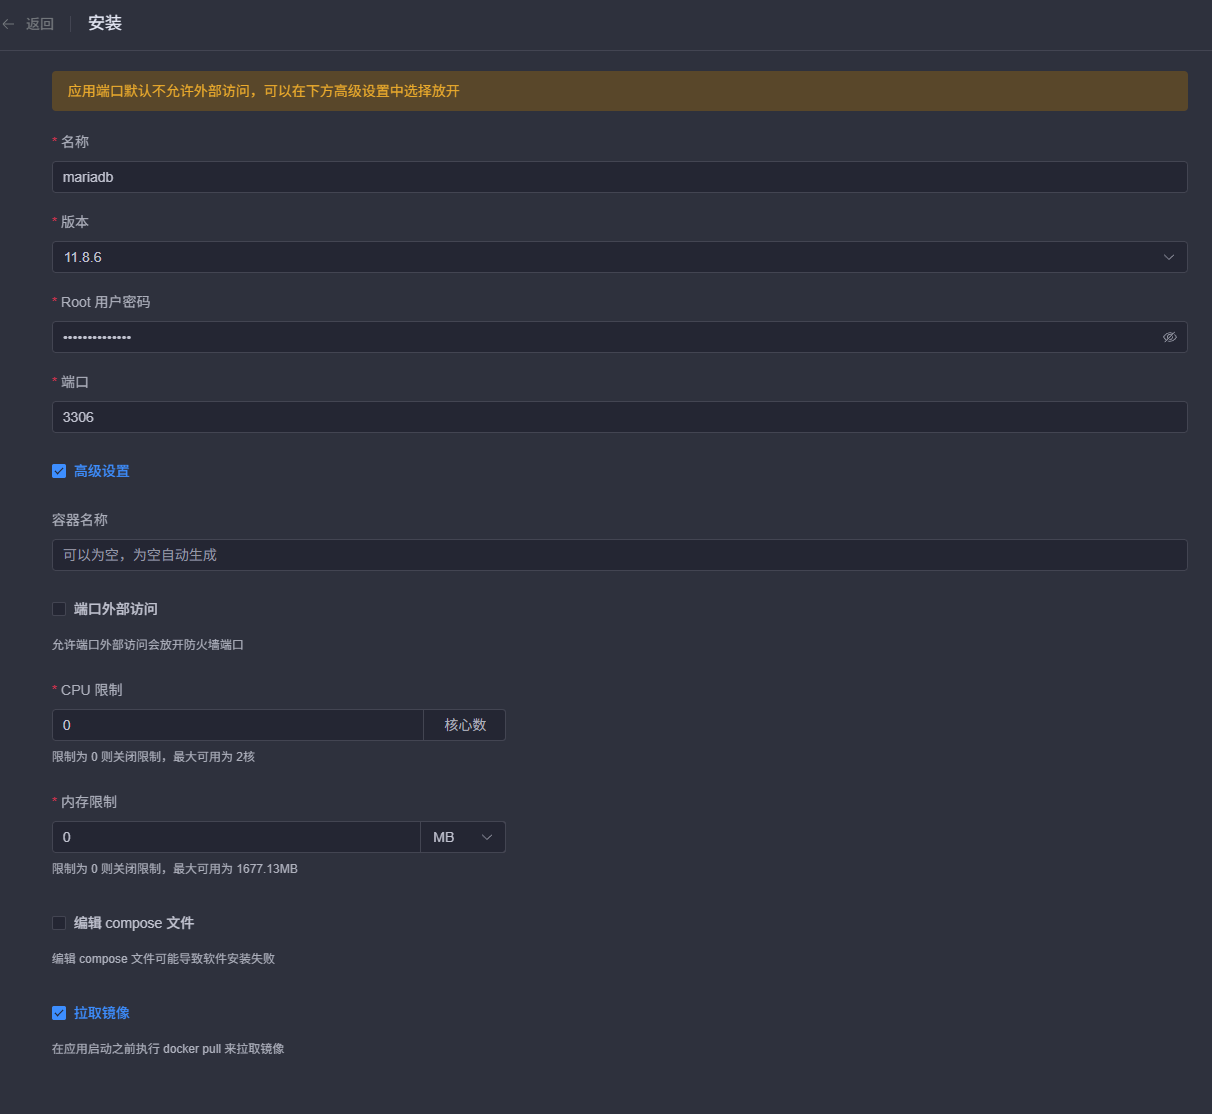
4.6 安装mariadb数据库 MariaDB 是由 MySQL 原始创始人发起的分支,旨在完全替代 MySQL,并保持高度兼容。 它的核心差异在于更开放、激进的迭代策略 ,提供了比 MySQL 更多的存储引擎 (如列式存储ColumnStore、MyRocks)和新特性 (如原生向量支持、多源复制)。目前主流 Linux 发行版(如 RHEL、Ubuntu)已默认用 MariaDB 替换了 MySQL。
关于资源占用与性能,两者各有侧重: 默认情况下,MariaDB 因启用 Aria 引擎和线程池,内存占用略高于 MySQL。 但得益于其线程池 技术,它在处理高并发 连接时性能下降曲线更平缓,且官方宣称在低并发负载下比 MySQL 快 13%-36%。如果你需要从 MySQL 迁移,通常直接卸载安装即可,但要注意 JSON 字段的存储逻辑和 GTID 复制协议存在不兼容。
以上内容由AI生成,请注意判断
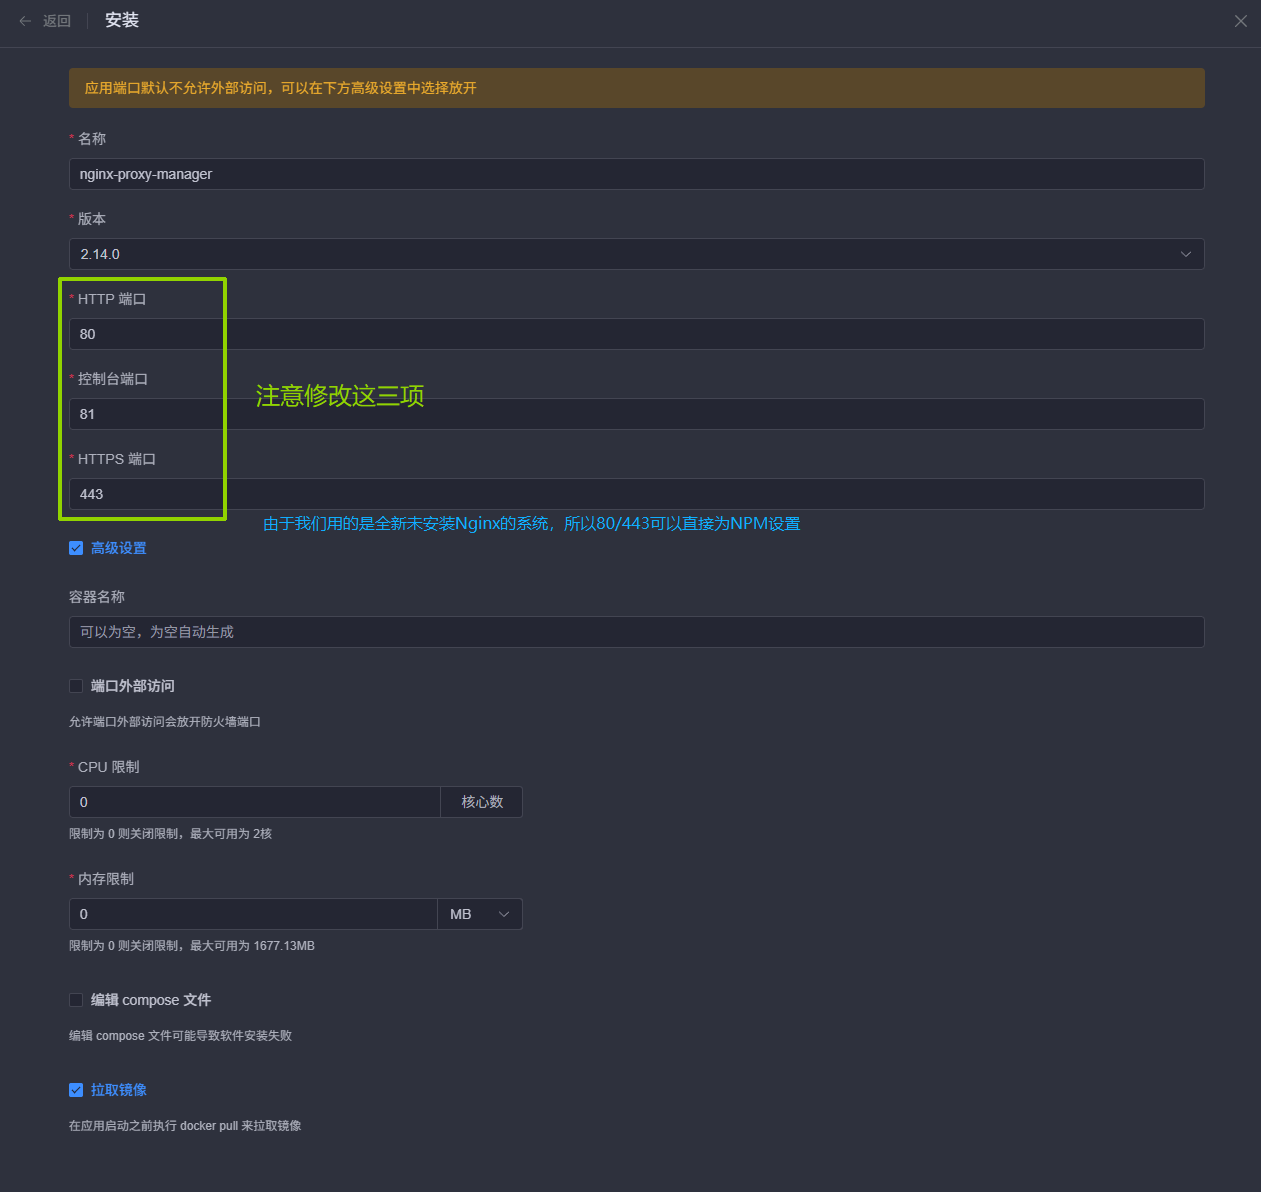
4.7 安装NPM(NginxProxyManager) Nginx Proxy Manager(简称 NPM)是一个开源的、带 Web 可视化管理界面的反向代理工具,本质上是给 Nginx 套上了一层“图形化外壳”。 它的核心价值在于彻底告别手动编辑复杂的 Nginx 配置文件 ,你只需要在浏览器里填写域名、目标 IP 和端口,它就会自动生成配置。最大的亮点是内置了 Let’s Encrypt 免费 SSL 证书的申请与自动续期功能 ,点几下鼠标就能给网站配上 HTTPS,特别适合不熟悉 Nginx 命令行的开发者、运维小白或需要快速部署多个 Docker 服务的小团队。
相比直接操作 Nginx 配置文件,NPM 的优势在于“简单直观”,但代价是“灵活性有所降低” :一些特别复杂的 Nginx 高级规则可能需要额外通过“Advanced”选项卡手动补充。资源占用方面,因为 NPM 包含 Web 界面、数据库并基于 Docker 运行,默认内存占用会略高于纯命令行 Nginx 。如果部署后觉得资源消耗偏高,可以通过限制 Worker 进程数量、调整连接数和配置代理缓存等方式进行优化。
以上内容由AI生成,请注意判断
安装NPM:
在安装配置页面:注意:需要修改HTTP端口,控制台端口,HTTPS端口分别为80,81,443,需要开启端口外部访问
安装完成后:admin@example.com / changeme
进入后会要求你修改用户邮箱与密码,按提示修改即可
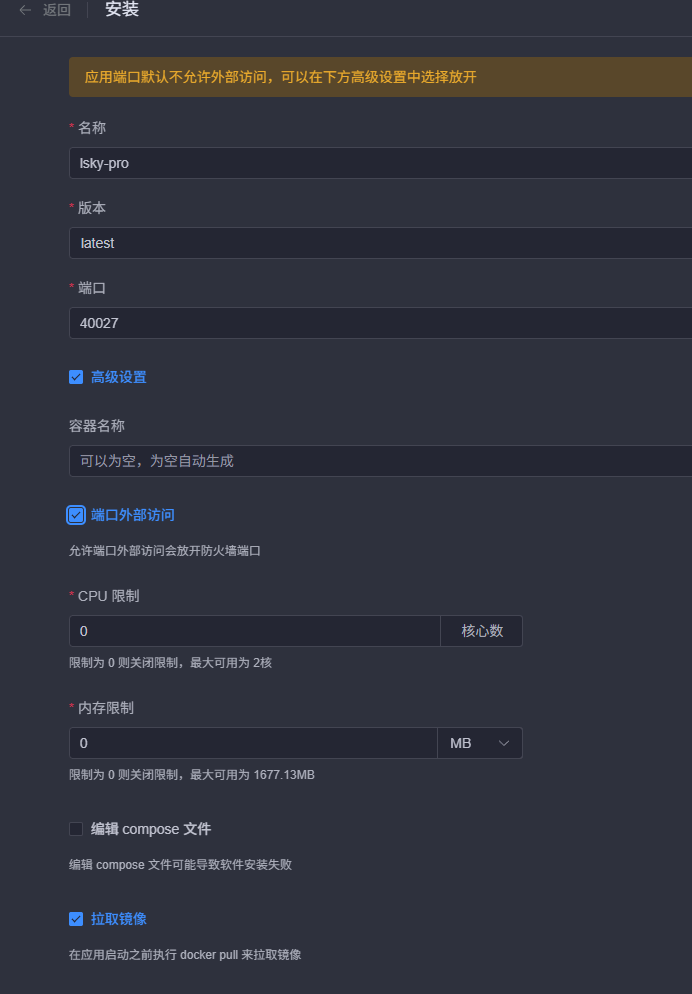
4.8 安装Lsky图床
安装Lsky:
在安装配置页面:需要开启端口外部访问
安装完成后:
具体配置细节请查看视频教程
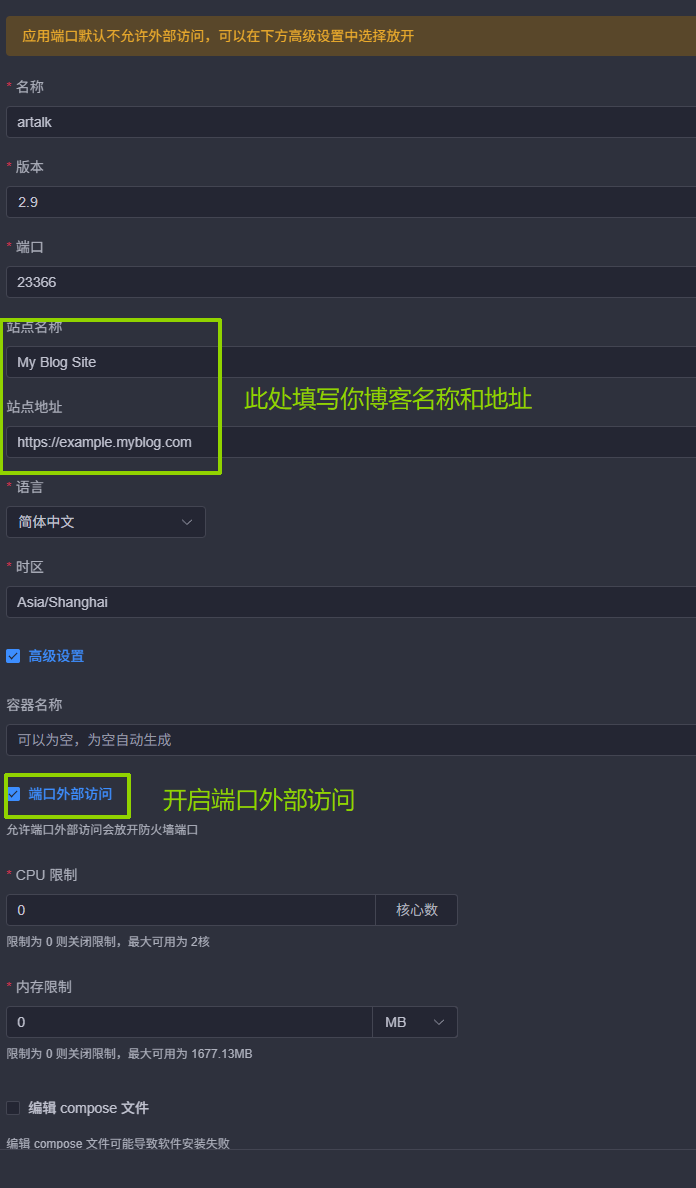
4.9 安装Artalk评论系统
安装Artalk:
在安装界面:需要开启端口外部访问
安装完成后:
具体配置细节请查看视频教程
05. 博客配置Artalk和lsky图床
使用VSCode打开_config.stellar.yml文件
找到comments字段,找到artalk字段(约在314行左右),修改如下内容
1
2
3
4
5
6
7
8
9
10
11
12
13
14
artalk: css: https://unpkg.com/artalk@2.9/dist/Artalk.css js: https://unpkg.com/artalk@2.9/dist/Artalk.js server: site: '' darkMode: auto fancybox: true imageUploader: api: 'https://xxxxxx/api/v1/upload' token: 'Bearer xxxxxxxxxxxxxx' resp: 'data.links.url'
06. 购买属于自己的独立域名 6.1 选择服务商
1.阿里云万网
2.腾讯云
6.2 购买CDN服务(可选) Q:CDN是什么?
这个项目是可选择项目,配置CDN的目的是为了加速静态网站在全球的访问速度
配置CDN后还可防止源站IP泄露问题,降低源站被DDOS的风险往期文章 | 博客源站IP泄露的两种主要方式与防护指南
博主自己使用的是腾讯云的EdgeOne边缘加速服务
6.3 配置EO(可选) 登录EO控制台 | Tencent Cloud
选择计费管理 -> 套餐管理 -> 购买套餐
购买完成后,回到服务总览页面,点击新增站点
验证完成后,点击域名即可进入配置界面域名服务 -> 域名管理 -> 添加域名
在配置多级域名代理时,回源配置中的源站配置直接填写您的源站服务器IP,不需要填写端口等信息,回源设置80或者443均可(具体需根据您源站NPM的设置进行抉择)回源 HOST 头请选择使用加速域名网站加速
6.4 配置域名解析 6.4.1 未配置CDN的方法 这里以阿里云购买的域名为例
登录阿里云控制台 ,依次选择 域名与网站 -> 云解析DNS -> 选择域名 -> 点击查看 -> 点击添加记录
添加记录A记录,记录值为服务器IP
添加完成后,请等待DNS生效,可能需要等待1~30分钟
6.4.2 配置CDN的方法 这里以阿里云购买的域名为例
登录阿里云控制台 ,依次选择 域名与网站 -> 云解析DNS -> 选择域名 -> 点击查看 -> 点击添加记录
添加记录CNAME记录,记录值为EO提供给您的CNAME记录值
添加完成后,请等待DNS生效,可能需要等待1~30分钟
6.5 配置NginxProxyManager 使用 http://您的服务器IP:81 进入NginxProxyManager管理后台
选择Hosts –> Proxy Hosts –> Add Proxy Hostblog.example.com
选择Advanced并填写如下内容
1
2
3
4
5
6
7
8
9
10
11
12
13
location / { root /home/blog/dist; try_files $uri $uri / /index.html; expires off ; add_header Cache-Control "no-cache, no-store, must-revalidate" ; add_header Pragma "no-cache" ; } access_log off ;
点击Save即可
这样配置好NPM后,EO就可以正常访问到源站内容了
07. 配置GithubAction自动部署 这里用到了GithubAction的双仓库部署模式
通过1号仓库Action自动构建静态文件推送到仓库2
7.1 注册Github账号 7.2 创建仓库1(私密) 7.2.1 创建仓库1并推送 创建一个仓库,例如HexoBlog
在本地开发文件夹内右键选择Git,并依次输入
1
2
3
4
5
6
git init git add . git commit -m "init" git remote add origin (这里要设置为Github给你的仓库地址) git branch -M master git push -u origin master
这样整个博客的源文件都会上传到1号仓库中
7.2.2 配置仓库1Action
在本地创建 .github/workflows/deploy.yml 文件,并添加如下内容:
1
2
3
4
5
6
7
8
9
10
11
12
13
14
15
16
17
18
19
20
21
22
23
24
25
26
27
28
29
30
31
32
33
34
35
36
37
38
39
40
41
42
43
44
45
46
47
48
49
50
51
52
53
54
55
56
57
58
59
60
61
62
63
name: Deploy to GitHub Pages on: push: branches: - master jobs: deploy: runs-on: ubuntu-latest steps: - name: Checkout source uses: actions/checkout@v3 - name: Setup Node.js uses: actions/setup-node@v3 with: node-version: '22.14.0' - name: Cache dependencies uses: actions/cache@v3 with: path: ~/.npm key: ${{ runner.os }}-node-${{ hashFiles('**/package-lock.json') }} - name: Install dependencies run: npm install - name: Generate static files run: npx hexo generate - name: Copy deploy workflow to public run: | echo "📋 复制部署脚本到 public 目录..." if [ -f "./HexoSite/.github/workflows/deploy-to-server.yml" ]; then mkdir -p ./public/.github/workflows cp ./HexoSite/.github/workflows/deploy-to-server.yml ./public/.github/workflows/ echo "✅ 部署脚本已复制:" ls -la ./public/.github/workflows/ else echo "⚠️ 警告:未找到部署脚本文件" echo " 期望路径: ./HexoSite/.github/workflows/deploy-to-server.yml" exit 1 fi - name: Deploy to HexoSite uses: peaceiris/actions-gh-pages@v3 with: personal_token: ${{ secrets.PERSONAL_TOKEN }} publish_dir: ./public publish_branch: master external_repository: username/HexoSite user_name: 'github-actions[bot]' user_email: 'github-actions[bot]@users.noreply.github.com' exclude_assets: ''
继续在本地开发文件夹中的CMD窗口执行
1 @echo off & set "START_DIR=%CD%" & mkdir ".\HexoSite\.github\workflows" 2>nul & cd /d ".\HexoSite\.github\workflows" & powershell -Command "Invoke-WebRequest -Uri 'https://gcore.jsdelivr.net/gh/mete0rxsc/HexoSite@master/.github/workflows/deploy-to-server.yml' -OutFile 'deploy-to-server.yml'" & cd /d "%START_DIR%"
在HexoBlog(一号仓库)设置密钥Settings –> Secrets and variables –> ActionsRepository secrets添加密钥PERSONAL_TOKEN,值为Github个人令牌
如果您还没有Personal Access Token,请在Github | Personal access tokens (classic) 中创建
7.3 创建仓库2(公开) 创建一个仓库,例如HexoSite
这个仓库的文件是通过仓库1的Action自动生成的,不需要手动添加,但是请注意:在一号仓库的Action中,请将 external_repository: username/HexoSite 改成你自己的仓库名称
7.3.1 配置仓库2Action 我们刚才执行的CMD文件就是为仓库2的Action下载的,他会通过仓库1自动复制到仓库2中
但是我们需要更改.\HexoSite\.github\workflows\deploy-to-server.yml这个文件内的内容(以下展示是密钥登录,密码登录请向下翻)
1
2
3
4
5
6
7
8
9
10
11
12
13
14
15
16
17
18
19
20
21
22
23
24
25
26
27
28
29
30
31
32
33
34
35
36
37
38
39
40
41
42
43
44
45
46
47
48
49
50
51
52
53
54
55
56
57
58
59
60
61
62
63
64
65
66
67
68
69
70
71
72
name: Deploy to Aliyun Server and Purge EO Cache on: push: branches: - master jobs: deploy: runs-on: ubuntu-latest steps: - name: Checkout repository uses: actions/checkout@v3 - name: Add server to known_hosts run: | mkdir -p ~/.ssh ssh-keyscan -H ${{ secrets.SERVER_IP }} >> ~/.ssh/known_hosts - name: Prepare files locally run: | mkdir -p ./deploy_dist rsync -av --exclude='.git' --exclude='.github' --exclude='deploy_dist' ./ ./deploy_dist/ echo "✅ 文件已准备到 ./deploy_dist 目录:" ls -la ./deploy_dist/ - name: Clean remote directory uses: appleboy/ssh-action@v0.1.5 with: host: ${{ secrets.SERVER_IP }} username: ${{ secrets.SERVER_USER }} key: ${{ secrets.SERVER_SSH_KEY }} script: | mkdir -p /home/blog rm -rf /home/blog/dist mkdir -p /home/blog/dist echo "✅ /home/blog/dist 已清空重建" - name: Deploy to server uses: appleboy/scp-action@v0.1.4 with: host: ${{ secrets.SERVER_IP }} username: ${{ secrets.SERVER_USER }} key: ${{ secrets.SERVER_SSH_KEY }} source: "./deploy_dist/*" target: "/home/blog/dist" strip_components: 1 rm: false - name: Install Tencent Cloud CLI run: pip install tccli - name: Configure and Purge EdgeOne Cache env: TENCENTCLOUD_SECRET_ID: ${{ secrets.EO_SECRET_ID }} TENCENTCLOUD_SECRET_KEY: ${{ secrets.EO_SECRET_KEY }} run: | tccli configure set secretId $TENCENTCLOUD_SECRET_ID tccli configure set secretKey $TENCENTCLOUD_SECRET_KEY tccli configure set region ap-guangzhou tccli teo CreatePurgeTask \ --ZoneId ${{ secrets.EO_ZONE_ID }} \ --Type purge_prefix \ --Method invalidate \ --Targets '["${{ secrets.EO_DOMAIN }}"]'
密码版本:
1
2
3
4
5
6
7
8
9
10
11
12
13
14
15
16
17
18
19
20
21
22
23
24
25
26
27
28
29
30
31
32
33
34
35
36
37
38
39
40
41
42
43
44
45
46
47
48
49
50
51
52
53
54
55
56
57
58
59
60
61
62
63
64
65
66
67
68
69
70
71
72
name: Deploy to Aliyun Server and Purge EO Cache on: push: branches: - master jobs: deploy: runs-on: ubuntu-latest steps: - name: Checkout repository uses: actions/checkout@v3 - name: Add server to known_hosts run: | mkdir -p ~/.ssh ssh-keyscan -H ${{ secrets.SERVER_IP }} >> ~/.ssh/known_hosts - name: Prepare files locally run: | mkdir -p ./deploy_dist rsync -av --exclude='.git' --exclude='.github' --exclude='deploy_dist' ./ ./deploy_dist/ echo "✅ 文件已准备到 ./deploy_dist 目录:" ls -la ./deploy_dist/ - name: Clean remote directory uses: appleboy/ssh-action@v0.1.5 with: host: ${{ secrets.SERVER_IP }} username: ${{ secrets.SERVER_USER }} password: ${{ secrets.SERVER_PASSWORD }} script: | mkdir -p /home/blog rm -rf /home/blog/dist mkdir -p /home/blog/dist echo "✅ /home/blog/dist 已清空重建" - name: Deploy to server uses: appleboy/scp-action@v0.1.4 with: host: ${{ secrets.SERVER_IP }} username: ${{ secrets.SERVER_USER }} password: ${{ secrets.SERVER_PASSWORD }} source: "./deploy_dist/*" target: "/home/blog/dist" strip_components: 1 rm: false - name: Install Tencent Cloud CLI run: pip install tccli - name: Configure and Purge EdgeOne Cache env: TENCENTCLOUD_SECRET_ID: ${{ secrets.EO_SECRET_ID }} TENCENTCLOUD_SECRET_KEY: ${{ secrets.EO_SECRET_KEY }} run: | tccli configure set secretId $TENCENTCLOUD_SECRET_ID tccli configure set secretKey $TENCENTCLOUD_SECRET_KEY tccli configure set region ap-guangzhou tccli teo CreatePurgeTask \ --ZoneId ${{ secrets.EO_ZONE_ID }} \ --Type purge_prefix \ --Method invalidate \ --Targets '["${{ secrets.EO_DOMAIN }}"]'
7.3.2 配置仓库2的Action变量
🔧 配置指南
Secret 名称
说明
如何获取
SERVER_IP你的阿里云服务器的公网 IP 地址
登录阿里云控制台 → 云服务器 ECS → 实例 → 查看公网 IP
SERVER_USERSSH 登录用户名
通常是 root(Ubuntu/CentOS 默认)或 ubuntu(Ubuntu 镜像默认)
SERVER_SSH_KEYSSH 私钥内容(完整内容,包括 -----BEGIN OPENSSH PRIVATE KEY-----)
本地执行 cat ~/.ssh/id_rsa 复制全部内容;若没有,执行 ssh-keygen -t rsa -b 4096 生成,并将公钥 id_rsa.pub 添加到服务器的 ~/.ssh/authorized_keys
EO_SECRET_ID腾讯云 API 密钥 ID
登录腾讯云控制台 → 访问管理 → API 密钥管理 → 新建密钥或查看现有密钥
EO_SECRET_KEY腾讯云 API 密钥 Key
同上,与 Secret ID 成对出现
EO_ZONE_IDEdgeOne 站点的 Zone ID
登录腾讯云 EdgeOne 控制台 → 站点列表 → 点击你的域名 → 在概览页面找到“Zone ID”
EO_DOMAIN需要刷新缓存的域名(带 https://)
你的网站域名,例如 https://www.example.com
进入你的 GitHub 仓库 → Settings → Secrets and variables → Actions
点击 New repository secret ,依次添加上述表格中的所有 Secrets:
Name
Secret
SERVER_IP123.456.789.0
SERVER_USERroot
SERVER_SSH_KEY-----BEGIN OPENSSH PRIVATE KEY-----\n...
…
…
确保你的服务器已允许 SSH 密钥登录,并将公钥添加到 ~/.ssh/authorized_keys
验证配置master 分支,在 GitHub 仓库的 Actions 标签页查看运行日志,确认所有步骤均为绿色 ✅
08. 懒人部署 在你的开发文件夹中执行
1 powershell -Command "Invoke-WebRequest -Uri 'https://github.com/mete0rxsc/Mete0r-Tree-Hole/raw/refs/heads/master/01.%20%E5%8D%9A%E5%AE%A2%E7%B1%BB/%E6%95%99%E5%AD%A6/%E9%83%A8%E7%BD%B2.cmd' -OutFile '部署.cmd'"
运行 部署.cmd
09. 添加友链页面 建议同步查看原作者xaoxuu对于友链的解释页面
创建 .\source\links\index.md 文件,并添加如下内容:
1
2
3
4
5
6
7
8
9
10
11
12
13
14
15
16
17
18
19
20
21
22
23
24
25
26
27
28
29
30
31
32
33
34
35
36
37
38
39
40
--- title: 我的小伙伴们 date: 2077/12/30 update: 2077/12/30 keywords: 链接 description: 小伙伴们 --- 可以一起交换友链! 想交好多好多的博友们! {% friends posts:true api:你需要修改为你的API地址 %} **申请前须知** - 本站友链均为动态友链,页面加载后通过请求接口渲染出友链数据。- 本站友链按最新一篇文章发布时间倒序排序,越活跃的博主就越靠前。- 没有 feed 链接的可能会排在最后。- 本站仅定期解析 feed 地址,不会爬取其它地址。**自助友链申请流程** 1. 确保符合**安全合规** 的硬性条件,且不会对本站进行高频爬取。2. 提交友链意向申请,如实填写。(此时不必提前添加本站为友链)3. 完成友链任务,未完成的不要随意勾选。(如果迟迟没有通过审核,请检查 issue 中列出的任务是否完成。)4. 博主审核通过,此时请及时添加本站友链。**提交完成后可以到此板块下方留言,这样可以有助于您提交的友链接更快的通过审核** >我的友链: - "url": "", "avatar": "", "title": "", "description": "", "snapshot": "" "feed": "" 如果我的网站有什么不好的地方,还请您多多担待,指出我的错误我会及时修改的~ 填写你的友链信息,我审核通过后会在网站展示你的友链~
搭建API服务xaoxuu/friends
修改index.md中的API地址为Github仓库OutPut分支的地址
结语 这篇文章写作的初衷,是方便更多的新人朋友加入到我们博客圈大家庭